HashCorpVault
此产品为配合dapr作为项目中秘钥数据存储使用
官方教程地址:https://developer.hashicorp.com/vault/tutorials/getting-started
介绍
Vault 带有各种称为秘密引擎和 身份验证方法的可插入组件,允许您与外部系统集成。这些组件的目的是管理和保护您在动态基础设施中的秘密(例如数据库凭证、密码、API 密钥)。
应用服务常常需要存取各种各样的机密信息,比如,数据库的访问凭证,依赖的外部服务的Token和Key,服务之间的通信凭证等等。在每个这样的应用中都重复实现机密信息的存取、更新与吊销等管理操作相当繁重,而且容易出问题。HashiCorp公司的开源项目Vault就将这部分工作以独立服务方式来实现,需要机密信息操作的应用可以与Vault服务交互完成相应的操作。
Vault的应用场景非常广泛,如:
- 机密信息存取
- 凭证的动态生成,比如数据库凭证、PKI证书、公有云服务的凭证等等
- 加密即服务
Vault架构非常清晰,如下图所示,主要分为三部分:
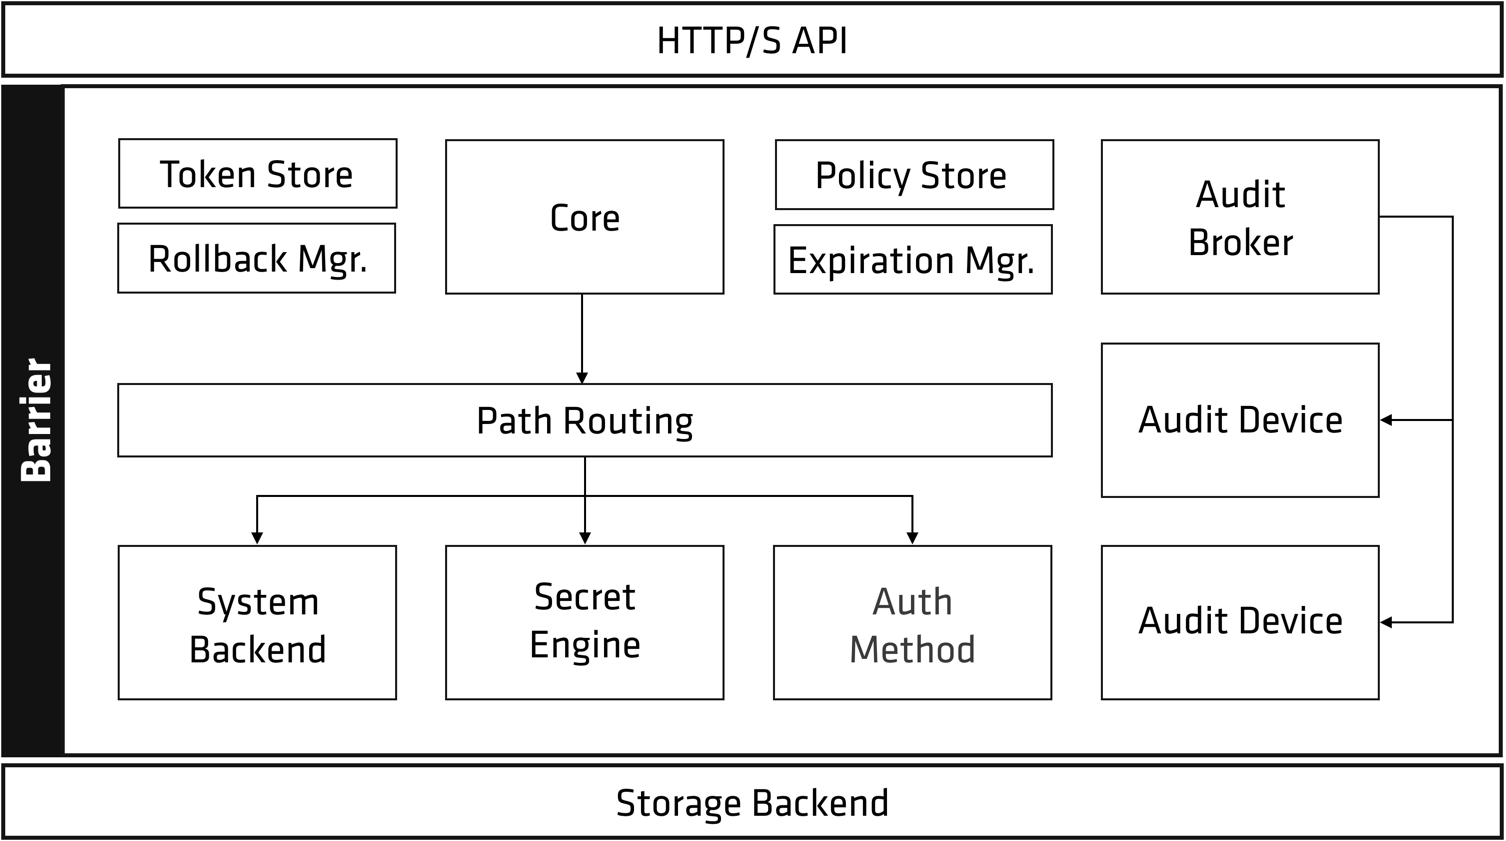
- HTTP/S API: Vault服务对外提供HTTP API接口
- Storage Backend: 负责加密数据的持久化存储, Vault支持多种存储机制。
- Barrier: 负责各种机密信息相关的处理逻辑,最核心的组件是
Secrets Engine和Auth Method。Secrets Engine负责实际机密信息处理功能的实现,各种不同的Secrets Engine有着不同的功能服务,Auth Method提供各种不同的身份校验方法。这两个组件都依赖Plugin机制实现,如果官方提供的功能不满足需求,还可以自己写相应Plugin实现特有功能或身份校验方法。
Vault服务部署启动后,处于”密封(sealed)”状态,此时不能提供服务。在该服务能接受请求前,需要初始化和”解封(unseal)”两个步骤。
Vault初始化时内部会生成一个加密密钥(Encryption Key), 这个密钥用于加密数据,对外是不可见的。Vault会再生成一个Master key来加密Encryption Key来保护它。Vault会使用Shamir密钥分享算法将MasterKey分割成若干份KeyShares,而根据其中的若干份KeyShares可以计算出原来的MasterKey。默认配置的KeyShares是5,还原所需要的份数为3。我们需要记录好所生成的KeyShares, Vault自身并不保存MasterKey。当我们忘记KeyShares后,我们就无法得到MasterKey, 从而数据也无法解密。
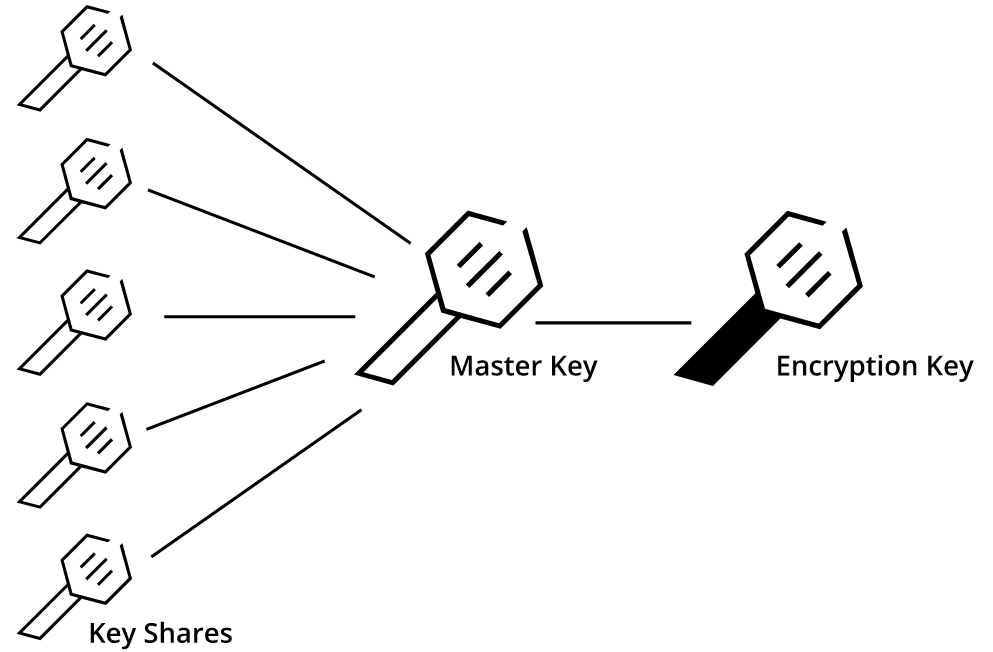
解封(Unseal)过程就是使用若干份KeyShares计算得到MasterKey, 解封之后,Vault就可以通过HTTP API对外提供服务了。
Vault接收到请求后需要先校验身份请求者身份信息,有多种Auth method可以选择,比如用户名/密码、Github帐号等等。支持的方法可以参考官方文档。身份校验通过后,Vault会根据身份所关联的策略检查该资源请求是否合法。root策略是内置的策略,它允许访问任何资源。Vault管理用户可以创建更细粒度的资源访问控制策略。除非在策略中明确允许访问某种资源,否则Vault会禁止访问。更深入了解策略可以参考官方文档
身份校验和策略检测都通过后,Vault会给该客户端分配一个Token。后续的请求都需要携带该token,类似于WEB访问的cookie机制。在Vault中,URL路径会关联一个Secrets Engine。Vault的路由组件会将特定的URL请求路由所关联的Secrets Engine来处理。
引擎 (Engines)
引擎概念:引擎就是存储、加密、解密数据的组件。
简单的引擎组件 kv引擎 不涉及加密解密,只是简单的存储和读取
`transit 引擎 加密存储数据,读取时解密
支持的引擎类型:
- AWS
- Consul
- Cubbyhole
- Database(多种)
- Identity
- Key/Value
- Nomad
- PKI
- RabbitMQ
- SSH
- TOTP
- Transit
Secret 类型
Key-Value:
简单的静态键值对,仅有版本化或非版本化区别,无过期概念
动态生成的凭据:
由Vault根据客户端请求生成
加密密钥:
用于使用客户端数据执行加密功能
这个类型的秘密引擎处理加密,解密,签名等加密功能。所有这些操作都使用Vault内部生成和存储的加密密钥。除非明确告知,否则Vault将永远不会公开给定的加密密钥
目前只有Transit引擎 支持,
策略
可设置策略,指定某个秘钥的权限
设置方式:
- 设置某个路径的权限策略
- 依据策略创建token
- 依据token访问数据
docker 安装--本地开发使用
创建文件夹 vaultcli 文件夹
创建 docker-compose.yaml 文件
创建config.hcl配置文件
Vault解密脚本.bat 此脚本在每次重启后进行解密使用
vault-UnsealKeys.txt 此内容为Vault解密Key需要将key复制到此文件中
docker-compose.yaml 文件
x1version"3.8"2
3services4 5 vault6 imagevaultlatest7 ports8"8200:8200"9 volumes10./vault/config:/vault/config11./vault/policies:/vault/policies12./vault/data:/vault/data13 environment14VAULT_ADDR=http://0.0.0.0:820015VAULT_API_ADDR=http://0.0.0.0:820016VAULT_ADDRESS=http://0.0.0.0:820017 cap_add18IPC_LOCK19 commandvault server -config=config.hcl20 config.hcl 文件
xxxxxxxxxx161storage "mysql" {2  address  ="192.165.10.102:3306"      #修改本机数据库配置3  database = "vault"4  username = "root"5  password = "sa123"6}7listener "tcp" {8  address     = "0.0.0.0:8200"9  tls_disable = "true"10}11
12disable_mlock = true13default_lease_ttl= "168h", 14max_lease_ttl= "0h",15api_addr = "http://0.0.0.0:8200"16ui = truexxxxxxxxxx21# cmd 命令 创建容器2docker-compose up将显示保管库的日志:
导出 VAULT_ADDR='http://0.0.0.0: 8200 '
根令牌:75de9b20-16fa-5a1e-2e9a-39c86caef504
需要上面的 2 条数据来导出根令牌和主机地址:
xxxxxxxxxx21export VAULT_TOKEN=75de9b20-16fa-5a1e-2e9a-39c86caef5042export VAULT_ADDR='http://127.0.0.1:8200'可访问的Url
web可视化界面 > http://127.0.0.1:8200
查看Vault状态地址 > http://127.0.0.1:8200/v1/sys/seal-status
vault常用命令
xxxxxxxxxx121vault status #查看vault状态2vault operator unseal <key> #base64位秘钥 输入次数与设置的最低次数一致才能解封,key为初始化生成的3vault token create -ttl 1m  #创建临时token,1分钟失效4vault secrets list #查询创建的secret引擎5vault secrets enable kv #创建kv类型的引擎6vault secrets enable transit #创建transit类型的引擎7
8vault kv put kv/hello foo=bar dummy=demo #创建名为hello 的kv集合,数据为 foo=bar dummy=demo9vault kv get kv/hello  #读取hello的参数10vault kv put kv/hello foo=bar dummy=demo2 #同样的key写入不同数据则会产生新的版本11vault kv get -version=1 kv/hello #设置不同版本读取不同版本的数据12
K8s安装
1.创建文件夹,拉取仓库
xxxxxxxxxx111mkdir vaultcli #创建文件夹2kubectl create namespace vault  #创建命名空间3
4#安装vault5 # 添加 valut 仓库6helm repo add hashicorp https://helm.releases.hashicorp.com7# 查看 vault 版本号8helm search repo hashicorp/vault -l | head9# 下载某个版本号的 vault10helm pull hashicorp/vault --version  0.20.1 --untar11
2.创建配置文件
创建 custom-values.yaml 配置文件
官方配置参数介绍:
https://www.vaultproject.io/docs/platform/k8s/helm/configuration#externalvaultaddr
官方安装配置:
修改配置文件中的数据库地址storage "mysql" { address = "192.165.10.102:3306" # 修改此处的数据库连接地址 username = "root" # 用户名 password = "sa123" # 密码 database = "vault" # 数据库名称 ha_enabled = "true"
注意:当服务器重启或服务重启,需要重新解密pod,否则无法使用
xxxxxxxxxx1251#创建配置文件2vim custom-values.yaml3
4global5 # enabled is the master enabled switch. Setting this to true or false6 # will enable or disable all the components within this chart by default.7 enabledtrue8 # TLS for end-to-end encrypted transport9 tlsDisabletrue10
11injector12 # True if you want to enable vault agent injection.13 enabledtrue14
15 replicas116
17 # If true, will enable a node exporter metrics endpoint at /metrics.18 metrics19 enabledfalse20
21 # Mount Path of the Vault Kubernetes Auth Method.22 authPath"auth/kubernetes"23
24 #certs:25 # # secretName is the name of the secret that has the TLS certificate and26 # # private key to serve the injector webhook. If this is null, then the27 # # injector will default to its automatic management mode that will assign28 # # a service account to the injector to generate its own certificates.29 # secretName: null30
31 # # caBundle is a base64-encoded PEM-encoded certificate bundle for the32 # # CA that signed the TLS certificate that the webhook serves. This must33 # # be set if secretName is non-null.34 # caBundle: ""35
36 # # certName and keyName are the names of the files within the secret for37 # # the TLS cert and private key, respectively. These have reasonable38 # # defaults but can be customized if necessary.39 # certName: tls.crt40 # keyName: tls.key41
42server43 # Resource requests, limits, etc. for the server cluster placement. This44 # should map directly to the value of the resources field for a PodSpec.45 # By default no direct resource request is made.46
47 # Enables a headless service to be used by the Vault Statefulset48 service49 enabledtrue50 # Port on which Vault server is listening51 port820052 # Target port to which the service should be mapped to53 targetPort820054
55
56 # This configures the Vault Statefulset to create a PVC for audit57 # logs. Once Vault is deployed, initialized and unseal, Vault must58 # be configured to use this for audit logs. This will be mounted to59 # /vault/audit60 # See https://www.vaultproject.io/docs/audit/index.html to know more61 auditStorage62 enabledfalse63
64 # Run Vault in "HA" mode. There are no storage requirements unless audit log65 # persistence is required. In HA mode Vault will configure itself to use Consul66 # for its storage backend. The default configuration provided will work the Consul67 # Helm project by default. It is possible to manually configure Vault to use a68 # different HA backend.69 ha70 enabledtrue71 replicas372
73 # Set the api_addr configuration for Vault HA74 # See https://www.vaultproject.io/docs/configuration#api_addr75 # If set to null, this will be set to the Pod IP Address76 apiAddrnull77
78 # config is a raw string of default configuration when using a Stateful79 # deployment. Default is to use a Consul for its HA storage backend.80 # This should be HCL.81 82 # Note: Configuration files are stored in ConfigMaps so sensitive data 83 # such as passwords should be either mounted through extraSecretEnvironmentVars84 # or through a Kube secret. For more information see: 85 # https://www.vaultproject.io/docs/platform/k8s/helm/run#protecting-sensitive-vault-configurations86 config87 ui = true88 listener "tcp" {89 address = "[::]:8200"90 cluster_address = "[::]:8201"91 tls_disable = true92 #tls_cert_file = "/etc/certs/vault.crt"93 #tls_key_file = "/etc/certs/vault.key"94 }95 storage "mysql" {96 address = "192.165.10.102:3306" 97 username = "root"98 password = "sa123"99 database = "vault"100 ha_enabled = "true"101 }102 service_registration "kubernetes" {}103 # Example configuration for using auto-unseal, using Google Cloud KMS. The104 # GKMS keys must already exist, and the cluster must have a service account105 # that is authorized to access GCP KMS.106 #seal "gcpckms" {107 # project = "vault-helm-dev-246514"108 # region = "global"109 # key_ring = "vault-helm-unseal-kr"110 # crypto_key = "vault-helm-unseal-key"111 #}112# Vault UI113ui114 # True if you want to create a Service entry for the Vault UI.115 #116 # serviceType can be used to control the type of service created. For117 # example, setting this to "LoadBalancer" will create an external load118 # balancer (for supported K8S installations) to access the UI.119 enabledtrue120 publishNotReadyAddressestrue121 # The service should only contain selectors for active Vault pod122 activeVaultPodOnlyfalse123 serviceType"NodePort"124 serviceNodePortnull125 externalPort82003.安装与初始化
xxxxxxxxxx651
2#安装3helm install vault hashicorp/vault --namespace vault -f custom-values.yaml4
5#查看状态,会部署三个服务6
7kubectl get pods -n vault -l app.kubernetes.io/instance=vault8...9NAME                                    READY   STATUS    RESTARTS   AGE10vault-agent-injector-77fbb4d4f8-mwngm   1/1     Running   0          30m11vault-2                                 0/1     Running   0          2m24s12vault-0                                 0/1     Running   0          2m24s13vault-1                                 0/1     Running   0          2m24s14
15## 当启动后,其中一台或两台服务器padding,需要执行去除污点16...17NAME                                    READY   STATUS    RESTARTS   AGE18vault-agent-injector-77fbb4d4f8-mwngm   1/1     Running   0          30m19vault-2                                 0/1     Running   0          2m24s20vault-0                                 0/1     Running   0          2m24s21vault-1                                 0/1     padding   0          2m24s22
23## 去除污点24kubectl taint nodes --all node-role.kubernetes.io/master-25
26# 初始化27kubectl exec --stdin=true --tty=true -n vault vault-0 -- vault operator init28
29# 会显示记录的解密秘钥和token 需要保存下来,登录和解密需要30...31Unseal Key 1: mK1PeGrP+A+QidoKzsYIpaAhszwaMCGd0dUMGZ1JWWoQ32Unseal Key 2: q2bazJZReOhY2yfJmJ8puS2FLF4mpWqlE6umws4M2lwl33Unseal Key 3: fnpqx2xpAtI4iTU8iTA3uFM5xP/yDqnsPMsDzVTEyqPa34Unseal Key 4: I2D1KeIA3lIqdlodRL1AeFBmvBoy92mg8kno3QD0mKN035Unseal Key 5: cNpXnigDnm/djUED5UE0nhAc3wXrfvIDKWQoVgzn5X5b36
37Initial Root Token: s.XP91VwITtMaMhiL1JMHzFpSR38
39#k8s启动三个台服务器,部署了三份,需要解密三次40## 解密vault-041$ kubectl exec --stdin=true --tty=true vault-0 -- vault operator unseal # ... Unseal Key 142$ kubectl exec --stdin=true --tty=true vault-0 -- vault operator unseal # ... Unseal Key 243$ kubectl exec --stdin=true --tty=true vault-0 -- vault operator unseal # ... Unseal Key 344
45## 解密vault-146$ kubectl exec --stdin=true --tty=true vault-1 -- vault operator unseal # ... Unseal Key 147$ kubectl exec --stdin=true --tty=true vault-1 -- vault operator unseal # ... Unseal Key 248$ kubectl exec --stdin=true --tty=true vault-1 -- vault operator unseal # ... Unseal Key 349
50## 解密vault-251$ kubectl exec --stdin=true --tty=true vault-2 -- vault operator unseal # ... Unseal Key 152$ kubectl exec --stdin=true --tty=true vault-2 -- vault operator unseal # ... Unseal Key 253$ kubectl exec --stdin=true --tty=true vault-2 -- vault operator unseal # ... Unseal Key 354
55
56#查看启动的pod和svc57kubectl --namespace='vault' get all58
59...60service/vault-ui        NodePort    10.1.42.143    <none>        8200:30124/TCP      86m61
62# vault-ui 映射端口 3012463# 浏览器中输入地址64# http://192.168.59.128:3012465# 登录 输入token登录  Initial Root Token
4.创建引擎


5.创建数据

创建的数据,需要根据需要的配置更改
x
201// Path for this secret 秘钥路径 : 2 CacheRedisConfig3//内容:4{5 "RedisConnString": "127.0.0.1:6379",6 "RedisDefaultDatabase": "2",7 "RedisPassword": ""8}9
10
11
12// Path for this secret 秘钥路径 : 13 commonserver14//内容:15{16 "AllowedHosts": "*",17 "ConnectionStrings": "Server=localhost;Port=3306;Database=commondb;Uid=root;Pwd=sa123;"18}19
20
6 .增加解封脚本
增加两个文件
unsealSH.sh
解封脚本vault-UnsealKeys.txt
解封秘钥存储文件
xxxxxxxxxx141# 创建sh文件2vim unsealSH.sh3
4#内容5
6
8for i in `cat vault-UnsealKeys.txt`9do10kubectl exec --stdin=true --tty=true vault-0 -- vault operator unseal $i11kubectl exec --stdin=true --tty=true vault-1 -- vault operator unseal $i12kubectl exec --stdin=true --tty=true vault-2 -- vault operator unseal $i13done14
xxxxxxxxxx101#创建秘钥存储文件2vim vault-UnsealKeys.txt3
4#内容 为Vault生成的token5yRPXJ7pxw4sP8fkJKyJQvZtyAXKQSzgZUa3bDoM4CQgQ6sL49v9sUWthlx9YRiSKfOsHu1ItntYOeZYcH4zzwmN2N7ovqjpsSVy7baLXnSfCdc4hDryBc3kVu1cEPks0tZsHiH8KXPtacUFe1O3uTJ/9cbE1c4a9bir8KtwY9wN5ZgyjIFH92iwk+5X08J4vnFKrQt+v7J3e4jxB6sQxSF7ReYy7ool010
执行文件命令
xxxxxxxxxx11sh unsealSH.sh
Dapr增加秘钥设置
创建秘钥管理文件
秘钥管理配置官方文档:
https://docs.dapr.io/reference/components-reference/supported-secret-stores/hashicorp-vault/
修改自定义秘钥管理地址和token
- name: vaultAddr value: http://127.0.0.1:8200 #修改为vault地址
- name: vaultToken value : "hvs.n9lOGM7LQXo8JtBogY64RXjA" #vault生成的token
xxxxxxxxxx361#创建秘钥管理yaml文件2# vim secretstores.hashicorp.vault.yaml3
4apiVersiondapr.io/v1alpha15kindComponent6metadata7 namevault-secret-store8 namespacenetapp-demo9spec10 typesecretstores.hashicorp.vault11 versionv112 metadata13namevaultAddr14 valuehttp//127.0.0.18200 #修改为vault地址15 #- name: caCert # Optional. This or caPath or caPem16 # value: "[ca_cert]"17 #- name: caPath # Optional. This or CaCert or caPem18 # value: "[path_to_ca_cert_file]"19 #- name: caPem # Optional. This or CaCert or CaPath20 # value : "[encoded_ca_cert_pem]"21nameskipVerify # Optional. Default: false22 value true23 #- name: tlsServerName # Optional.24 # value : "[tls_config_server_name]"25 #- name: vaultTokenMountPath # Required if vaultToken not provided. Path to token file. ~/.vault-token26 # value : ""27namevaultToken # Required if vaultTokenMountPath not provided. Token value.28 value "hvs.n9lOGM7LQXo8JtBogY64RXjA"29 #- name: vaultKVPrefix # Optional. Default: "dapr"30 # value : "dapr"31namevaultKVUsePrefix # Optional. default: "true"32 valuefalse33nameenginePath # Optional. default: "secret"34 value"secret"35namevaultValueType # Optional. default: "map"36 value"map"
修改redis-storage-class.yaml 配置 从vault读取
xxxxxxxxxx211apiVersiondapr.io/v1alpha12kindComponent3metadata4 namestatestore5 namespacenetapp-demo6spec7 typestate.redis8 versionv19 metadata10nameredisHost11 secretKeyRef# redis地址12 nameCacheRedisConfig13 keyRedisConnString14nameredisPassword15 secretKeyRef# redis密码16 nameCacheRedisConfig17 keyRedisPassword18nameactorStateStore19 value"true"20auth21 secretStorevault-secret-store #引用秘钥管理配置源
修改redis-pubsub.yaml配置 从vault读取
xxxxxxxxxx191apiVersiondapr.io/v1alpha12kindComponent3metadata4 namepubsub5 namespacenetapp-demo6spec7 typepubsub.redis8 versionv19 metadata10nameredisHost11 secretKeyRef# redis地址,可修改为其他组件12 nameCacheRedisConfig13 keyRedisConnString14nameredisPassword15 secretKeyRef# redis地址,可修改为其他组件16 nameCacheRedisConfig17 keyRedisPassword18auth19 secretStorevault-secret-store # 引用秘钥管理配置源